14 December 2015

Amritsari Kulcha

      Indian breads is truly an exhaustive list. The amount of variations is almost limitless, from the grains(s) / flour(s) used, to thickness, cooking techniques, stuffed or without, and even the number and styles of layering....

Amritsari Kulcha remained a yet-untried venture for me, plus our Foodie bloghop theme being Indian breads, this weekend called for punching the dough and striking it off my to-try list... 
And...keeping up with my resolve to use the "white flour" as less as possible, I used more of Whole Wheat Flour, inspired by this blog 


AMRITSARI KULCHA (WHEAT FLOUR)


Ingredients : (Makes 12 Kulchas about 5 inches in diameter)

For the dough :

Whole Wheat Flour-1.5 cups
Refined Flour - 1/2 cup (More for elasticity, else you can use 2 cups wheat flour alone)
Salt to taste
Baking Powder-1 tsp
Baking Soda-1/2 tsp
Oil-3 tbsps
Curd -1/4 cup
Warm Milk-1/4 cup 
Water - as required

Filling:
Boiled Potatoes- 2 medium 
Salt to taste
Green Chili (chopped) - 1 to 2
Onion (chopped) - 1
Red Chili powder-1 tsp
Cumin(Jeera) Powder-1 tsp
Chaat Masala-1/4 tsp
Fresh Coriander (chopped)

Method :

1. To assemble the dough, sieve together the flours, salt, baking powder and soda, or mix well with hands. Make a well in the centre and add the oil, curds, warm milk mixing them into the flours as you add them. Knead into a soft dough using enough water, cover and keep aside for 30 minutes.

2. Meanwhile, let's prepare the filling. Peel and mash the boiled potatoes, add salt, chopped green chilies, chopped onion, red chili powder, jeera powder, chaat masala and chopped coriander. Mix well using your hands and keep aside.

3. Divide the dough into 12 equal portions and make same number of portions for the filling as well.

4. Flatten one dough ball and place the filling in the centre, seal well. Place a plastic sheet on the counter, keep the round on the sheet and fold the plastic sheet over it. Now flatten the round into a 1cm thick disc using your fingers or a rolling pin. It's ok if the stuffing comes out a bit.

5. Heat a tawa on medium heat and put the kulcha on to it. Let cook a bit on both sides, then flip and drizzle oil over and around it to cook further till golden brown spots appear. Remove. Repeat with the rest of the dough.

Serve hot with desired accompaniment.


7 December 2015

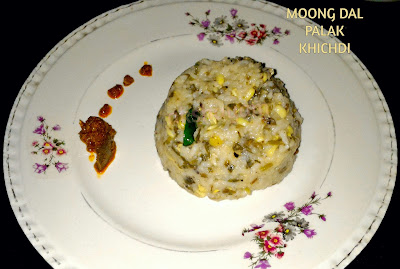
Moong Dal Palak Khichdi

        One pot meals are not just the most convenient, but also an all-in-one comfort food that satiate one's appetite without over-crowding it with choices!! Khichdi, the ultimate Indian one-pot meal, is a great combination of rice and pulses and need the company of just some curd and pickle. As the saying I heard somewhere, Khichdi ke chaar yaar, Ghee, Dahi, Papad aur Achaar!! (The 4 companions of Khichdi - Clarified butter, Curd, Papad and pickle :) )

This khichdi comes with a twist, inspired from a recipe from a favourite TV show

MOONG DAL PALAK KHICHDI

Khichdi


Ingredients

Whole Green gram (moong dal) - 2 cups, soaked for 2 hours
Sprouted Green gram - 1 cup
Chopped Spinach - 1 cup
Turmeric powder (Haldi) - 1/4 tsp
Green chilies - 3
Buttermilk - 4 cups
Rice - 2 cups
Oil - 2 tsps
Cumin seeds (Jeera) - 1 tsp
Cloves - 3 to 4
Salt to taste
Clarified butter (Ghee) - 3 tbsps + 2 tbsps
Chopped Garlic - 4 to 5 cloves
Chopped Ginger - 1 tbsp

Method

1. In a pressure pan or cooker, heat the oil and add jeera & cloves and fry for a bit.

2. Add the soaked green gram, chopped spinach, turmeric powder, salt, rice and fry for 3-4 minutes.

3. Now add the sprouted green gram and mix again. Pour 3 tbsps ghee and add slit green chilies and mix. Finally add the butter milk and cook on high heat up to 2 whistles, reduce heat and cook up to 2 whistles more.

4. Remove and let the pressure naturally release. Heat 2 tbsps ghee in a large pan and fry the chopped ginger and garlic till golden brown. Add the cooked Khichdi gradually and stir well.

Serve hot with curds and pickle of choice.


30 November 2015

Chocolate Pineapple Mousse

        An all-time favourite and a simple to make dessert, mousse. Takes just a few ingredients and can be modified and improvised upon endlessly. 

CHOCOLATE PINEAPPLE MOUSSE


Ingredients : (Serves 4)

Dark cooking Chocolate (I used Amul's dark choc)  -  200 gms
Cream - 200 ml
Pineapple (chopped into small pieces) - 1/4 cup (you can use any fruit of your choice)
Chopped cashews - for garnishing

Method :

1. Chop the dark chocolate into small pieces and add to a heat-proof bowl. Add water in a saucepan and place the bowl with chocolate pieces over it. Make sure the bowl doesnt actually touch the water. Let simmer over low heat and stir occasionally as the chocolate starts to melt. When melted completely, remove and let cool to room temperature. 

2. Add chilled cream to a large bowl and whip using a hand blender till soft peaks form. Take care to not whip at a very high speed or for long else it will turn into butter. Fold in half the cream into the melted and cooled chocolate and refrigerate the remainder till further use. 


3. To assemble, place a dollop of cream at the bottom of the serving bowl. Drop in a few pineapple pieces. Now add a large spoonful of chocolate & cream mix. Add a few more chopped pineappale pieces and finally top off with a little more cream. Garnish with chopped cashews(optional) and leave in the fridge to set for about an hour. 
Serve chilled. 

**Notes :-
a) Chill the cream, bowl and the blades of the hand blender till you need them for whipping. 
b) If you find the cream consistency a bit runny, add a little icing sugar while blending. 


27 November 2015

Spicy Orange-Berry Marmalade

                Of all the jams I have had in my lifetime, my favourite is the Orange Marmalade. I have been wanting to try it out for a long time now, and seeing oranges in all shapes, sizes and prices everywhere, I finally decided to go for it... .
As a variation, I added some blueberries in. Unfortunately I didnt have a good stock of fresh ginger, else would have added that in too....


ORANGE-BLUEBERRY/STRAWBERRY MARMALADE
Ingredients : (yields about 800 gms)

Oranges (un-peeled) - 3 medium
Blueberries/Strawberries - 1/2 cup
Water - 1.5 cups
Sugar - 1 cup
Ginger - 2 inches piece (optional)
Cinnamon powder - 1 tsp (optional)
Clove powder - 1 tsp (optional)
Juice of 1 lemon

Method :

1. Peel the oranges, de-seed, remove the white membrane, fibre and chop into small pieces. Gently scrape off the fibre from the peel and chop into small slivers. Keep aside. 
Some prefer chopping the fruits as is without peeling or removing the pith. Pith adds extra bitterness, so absolutely OK to follow that method too. I like it this way :)
If using frozen blueberries, thaw the required amount of berries and re-store the remaining in the fridge. Chop the Strawberries if using them.

2. Place 2 small steel plates in the fridge. This will  be used to check the jam consistency later. 2 plates because if you need to check 2-3 times, then the same plate returned to the fridge might not be cold enough for the next check. Best to alternate to get a good result.

3. Add water to a thick bottomed wok or kadhai alongwith the chopped oranges, peel and berries. Bring to a boil on medium heat. This should take about 30 minutes. Check by squishing an orange peel to see if it's tender. If need be, use a masher to gently mash the fruits. Do this on low heat and take care not to scald oneself.

4. Now add the sugar and let boil again on medium heat, stirring occasionally till the mixture starts to thicken. 

5. Grind (with about 1-2 tsp water) or finely grate ginger. You can either use the extract or the grated ginger as is. 

6. Take out a plate from the fridge and put a drop of the mixture on it, leave for a minute. If it's too runny, continue to cook. If it starts to solidify after a minute and you can roll it up like jelly, then we are good and the heat can be turned off. 
It may still look runny, but due to the presence of sugar, the jam will thicken further when it starts cooling down. 
Note: If you continue boiling because it's runny, you risk caramelising the sugar.

7. Add grated/ground ginger or ginger extract along with the cinnamon powder and clove powder and stir well. Simmer for few minutes more. Do not boil too much after adding the spices as it will lose the flavour.

8. After removing from the fire, add the lemon juice and stir well. Lemon juice not only helps the jam set better, it's a great natural anti-bacterial preservative as well.

9. Now leave to cool at room temperature, if you've made a large quantity, give it a good 24 hours. You will notice the marmalade thickening with time. Store in a clean bottle, best refrigerated for longer shelf life.


23 November 2015

Pumpkin Oats Soup

             One can feel the chill in the air, turn of the season - warm clothes, warmer food... The time of the year when soups are a more welcome appetiser to stimulate the palate. Another one to add to my soup repository and one for the 15th #FoodieMonday #BlogHop, a simple Pumpkin soup spiced up with Masala Oats!! Oats acts as the natural thickener here, avoiding the use of cornstarch...


PUMPKIN OATS SOUP


Ingredients : (Serves 3-4)

Red Pumpkin - 250 gms
Saffola Masala Oats (Veggie) - 3 to 4 tbsps
Boiled corn - 1/2 cup
Water - 3 cups + 1 cup
Salt to taste
Crushed Black Pepper

Method

1. Peel and de-seed the pumpkin and cut into rough chunks. Grind to a fine paste using 1 cup water.

2. Transfer a portion of this paste to a sieve (** - See notes). Using the remaining 3 cups water, extract the juice into a thick-bottomed saucepan.  

3. When you feel the pumpkin paste has little moisture left, add the masala oats, salt to taste, crushed black pepper and start stirring on medium heat. 


4. After about 4-5 minutes, add the boiled corn. When the soup starts to thicken (after about 7- 8 minutes), remove and let cool a bit. If you want the soup thicker, add some more oats.
Serve warm garnished with coriander leaves and soft bread, croutons or bread sticks.

** - Do not use a fine sieve, use one with a wider mesh so a little fiber also goes through along with the pumpkin juice


16 November 2015

Veg Lasagna

    I am a big fan of Italian cuisine (after Indian cuisine, of course!!), and not just the ubiquitous Pizza. And while I keep attempting the pasta, pizza and even the gnocchi at home, lasagna was one thing I was putting off, more for fear of getting the homemade lasagna sheets wrong!! But fears are meant to be conquered, so I set out to try it and get it as right as I could!! Plus, the 14th Foodie Monday Bloghop theme was baking...I got the recipe for homemade eggless lasagna sheets from this blog


VEG LASAGNA


Ingredients :

Vegetable filling :
Boiled & diced potatoes (not too squishy) - 1 cup
Diced red pumpkin (Kaddu) - 1 cup
Diced capsicum - 1 cup
Blanched Cauliflower florets (** - see notes) - 1 cup
Soaked & drained soya nuggets - 1/2 cup
Boiled & diced carrots - 1 cup
Salt to taste
Red Chili powder - 1 1/2 tsps
Garlic powder - 1 1/2 tsps
Dried Oregano or mixed Italian herbs - 1 tsp

For Lasagna sheets - Makes about 10 sheets (original credit to this recipe ) :
Refined flour - 1 cup
Wheat flour - 1/2 cup 
Water - between 1/2 and 3/4th cup

Other ingredients (I used a white sauce topping, but you can use any) :
Cheese - 5 cheese slices or 1 cup grated processed cheese
Milk - 2 cups
Refined or wheat flour - 2 tbsps (dissolved in milk)
Black pepper powder - 1 tsp
Salt to taste
Dried Oregano or mixed Italian herbs - 2 tsps
Garlic powder - 1 tsp

Olive oil - 2 tbsps

Method

1. Heat olive oil in a wok and add the red pumpkin. Sprinkle little salt and cover cook till 3/4th done. Now add the cauliflower florets

2. Once the cauliflower is half-done as well, tip in the capsicum and let cook. Again when this is half done, add the remaining vegetables one by one. Add some more salt to taste along with chili powder, garlic powder and mix well. After about 5-7 minutes add the dried Italian herbs, let cook for couple minutes more and remove.

3. While the veggies are cooking, let's prepare the dough for the lasagna. In a clean bowl, add the refined flour and wheat flour. mix using a fork. Now add water little by little and keep mixing with the fork. 

4. Once the flour is assembled, knead with hands to get a firm but soft dough. Take care not to make it stretchy or add more water than needed. A little dry texture is fine here, but not crumbly. Let rest for 10 minutes.

5. For the white sauce, pour the milk and flour mix into a saucepan and keep stirring to avoid lump formation. Add in the cheese and stir again till cheese mixes well. Add the salt, black pepper powder, garlic powder and dried herbs. Stir for just a minute more and remove. It's ok if the sauce is a bit runny as it will typically thicken once cooled.

6. Dust a counter with some flour. Divide the dough into 2 portions. Roll out into a rough square and cut into 2. Keep one portion aside and continue to roll out the other half into as thin a sheet as possible and manageable. 

7. Keep dusting flour while rolling out. When you have a fairly large rectangle or square, cut into lasagna sheets or strips as desired and depending on the size of your baking dish. I used these rectangular ceramic dishes. 


8. Dust the sheets liberally with dry flour and place them on a flat tray or plate. Boil enough water in a large saucepan and salt. Gently drop in the pasta sheets one by one and take them out after a count of 10 seconds. Use a wide rimmed ladle to scoop them out lest they tear. Place them to drain on a plate.

9. Now comes the assembling. Coat the baking dishes with oil. Place 1 lasagna sheet. Add a layer of the veg filling and top off with another pasta sheet. Repeat as desired. It is also optional to add grated cheese in between layers if you like it rich. (I do!!)

10. Finally generously pour the white sauce over the assembled lasagna so that it coats all layers and then some. Using a microwave, I baked this at 200 deg C for 8-9 minutes and then at 170 deg C for 4 minutes more or till golden bubbles formed at the top. Remove from the oven, let cool for a bit. Cut and serve. 


(** - Advisable to blanch cauliflower and broccoli florets in boiling water with a 1/2 tsp turmeric powder added to it, then drain, wash and use for your dishes. This is not ideal but at least de-contaminates the florets of possible worms)


9 November 2015

Madras Mixture

         One of the most typical fried snacks available in any eatery or specialised shops in Tamil Nadu, the Madras Mixture. A mélange of multiple items, the taste is simply wonderful and makes this snack an anytime...no, all-time favourite!! Though the prep can be a bit laborious, the assembling is far less complicated.
While most of the shops tend to add pieces of other items such as Ribbon Sev and so on..this is the most typical recipe..


MADRAS MIXTURE


Ingredients

Omapodi / Thick Sev (recipe here) - 250 gms
Unsalted Boondi - 250 gms (if you find this bit difficult to prepare at home, better to buy the readymade one, but plain since we'll be adding salt while assembling)
Roasted peanuts - 100 gms
Curry leaves - 1 cup
Flattened rice (Thin chiwda is best for this) - 100 gms
Roasted gram (Pottukadalai) - 100 gms
Thin Maida biscuits or Namak para (optional) 

Oil for frying
Salt to taste
Chili powder to taste
Asafoetida (Hing) powder
Clarified butter / Ghee


Method

1. Heat oil for frying. Using a deep slotted ladle, fry the Chiwda/Poha and curry leaves together, inside the ladle itself. This is helpful as you dont need to chase the flimsy ingredients all over the wok!! Remove and drain excess oil.


2. In a small bowl, make a paste using salt, chili powder, hing and just enough ghee to hold these together, not a runny paste. 


3. In a large bowl, add all the components of the mixture - Omapodi, Boondi, peanuts, fried curry leaves & poha, roasted gram and thin maida biscuits. Toss them together gently. 

4. Now we add flavour to the bland mixture. Transfer a portion of the mixture to another large mixing bowl. Take a little salt-chili paste in your hands and toss the mixture gently so that the spices coat all the ingredients evenly. Check taste, and if OK, put this into the final air-tight container. 
Repeat with the remaining bland mixture, using a portion at a time. Remember to keep the flavours as even as possible between these portions.
Once the entire mixture is in the air-tight container, shake it gently once to twice. 
Your MADRAS MIXTURE is ready to be served!!

8 November 2015

Choco-Flavoured Rava Laddu

An easy to make laddu using just a handful of ingredients, but taste - simply out of the world. This one is with the twist of a choco flavour.


CHOCO-FLAVOURED RAVA LADDU


Ingredients :

Semolina (rava) - 1 cup
Powdered sugar - 1 cup
Cashews (broken into small bits) - 1/4 cup
Clarified butter (Ghee) - 1/4 cup + 2 tbsps (for frying cashews)
Cardamom (Elaichi) powder - 1/4 tsp
Cocoa powder - 1 tsp

Method :

1. Dry roast semolina till it lets out an aroma, but do not let it become brown. Transfer to a large plate and let cool to room temperature. Dry grind to a fine powder. Add the powdered sugar and pulse once to mix it well.

2. In a bowl, add the powdered mix. Add the elaichi and cocoa powder and mix well. 

3. Heat 2 tbsps ghee and roast the cashews till golden brown. Add to the rawa mix.

4. Heat the 1/4 cup ghee and pour over the mix. Mix well with a ladle, then using your hands mix again. Prepare laddus when the mix is still tolerably hot, if it cools down the laddus will not hold together.
Press the mixture firmly but gently into the palms of your hand and make into rounds. 
Store in an air-tight container. 


Ribbon Sev(Ribbon Pakoda)

      Another one of my Diwali favourites is the Ribbon Sev or Ribbon Pakoda as we call it!! Again, a simple preparation, the key is to get the dough right..


RIBBON SEV


Ingredients : (Makes about 250gms of Sev)

Bengal gram flour (Besan) - 1 cup
Rice flour - 1/2 cup
Salt to taste
Red Chili Powder - 1/2 tsp
Clarified butter (Ghee) - 2 tsps

Method :

1. Sieve together Besan, rice flour and chili powder into a clean and dry bowl.

2. Dissolve the salt in a little water, take care to add a little first, lest it becomes too salty.

3. Add ghee, salt dissolved in water and knead into a soft dough using enough water. 


4. Heat oil over medium heat for frying. Stuff a little dough into a murukku or sev press with the Flat sev plate fitted in. 


5. Place a large flat slotted ladle on a plate and squeeze out a portion of the dough on to it. Make any shape you desire. Dip the ladle into the hot oil and let slide out. Fry on low to medium heat till light golden brown. Remove to drain excess oil. Once cooled to room temperature store in an air-tight container.


2 November 2015

Omapodi / Thick Sev

       Diwali is right round the corner!! And that means lights, new dresses, new decor for the house, everything new!! Not to forget - savoury snacks, sweets, which keep disappearing the moment they hit the storage jars :)
We start off with a pretty simple savoury snack, called Omapodi, a thick variety of sev, that can be had on its own or crushed and used for the South Indian mixture as well. The name comes from Omam, which means Ajwain or Carom seeds; in the olden days the ajwain was manually ground in the Roller stone, Silbatta (Hindi) or Ammi (in Tamil). But to make it easier now, one can use the ready made Ajwain water available in the market, or simply prepare at home by boiling some carom seeds in water and letting it cool down to room temperature before use.

OMAPODI / THICK SEV


Ingredients : 

Bengal gram flour (Besan) - 1 cup
Rice flour - 1/4 cup
Salt to taste
Chili powder (optional) - 1 tsp
Ajwain water - enough for kneading the dough
Clarified butter (Ghee) or unsalted butter - 2 tbsps

Method :

1. Sift together besan, rice flour and salt so as to remove lumps.

2. Add chili powder and knead into a smooth but stiff dough using sufficient ajwain water and ghee or butter.

3. Prepare the Sev press by fitting in the pin-hole plate. We use the traditional press made of brass, which has inter-changeable plates for different savouries. It's also available in stainless steel, as also with brands such as Anjali.
 

4. Divide the dough into equal portions that will fit into your sev/savoury press instrument. Meanwhile heat oil for frying in a wide kadhai or wok.

5. Reduce the flame to low and slowly press the dough through the instrument and into the oil, into desired shapes. Try to to make connected swirls, much like Jalebi or smaller ones, depending on the size of your wok. Increase the flame to medium heat and let fry till light golden. Remove and drain excess oil.

6. Once cooled down to room temperature, store in an air-tight container.


26 October 2015

Stuffed Karela in Gravy

        What's the one vegetable that tops the list of 'Least liked veggies' ??? Of course, Bitter gourd, or the humble 'Karela'!! It's always a challenge to serve the more likeable vegetables in as different and interesting variations as possible, so imagine how much the mind needs to rake up its creative juices to make the un-interesting vegetables, appealing!!
Here, I attempt a simple stuffed Karela in a basic gravy....
STUFFED KARELA IN GRAVY


Ingredients :
Tender Bitter gourd (Karela) - 2 medium
Salt - 2 tbsps
Chili powder - 1 tsp

Gravy :
Tomatoes - 3 medium
Red Pumpkin (cubed) - 1 cup
Onions - 2 medium
Ginger - 1 inch piece
Garlic - 2 to 3 cloves
Salt to taste
Oil - 2 tbsps
Cumin seeds (Jeera) - 1 tsp
Chili powder - 2 tsps
Turmeric poweder - 1/2 tsp
Garam masala - 2 tsps

Stuffing :
Crumbled paneer - 1 cup
Finely chopped spinach (palak) - 1/2 cup
Salt to taste
Chili powder - 1/2 tsp
Garam masala - 1/2 tsp

Oil for shallow frying

Method

1. Peel the bitter gourd to remove the ridges and make it as smooth as possible. Cut into 1cm thick roundels, scoop out to make them hollow and add to a bowl. Sprinkle a generous amount of salt and 1 tsp chili powder. Shake well and keep aside for about 10 minutes. 

2. Meanwhile, grind onions, ginger and garlic into a fine paste. Grind tomato and red pumpkin separately.

3. Wash the bitter gourd roundels well in running water and drain. Steam cook with a little bit of salt sprinkled over them, for about 10 minutes or till 3/4th tender. Keep aside.

4. Heat 2 tbsps oil in a kadhai/pan. Add jeera and let crackle. Add the onion-ginger-garlic paste along and sauté for about 2-3 minutes.

5. Add salt, turmeric pwder, chili powder, garam masala and let fry. Once the oil separates, add in the tomato-pumpkin gravy. Stir occasionally and let cook for 5 to 7 minutes more. Check for salt and turn off the flame once gravy is done.

6. For the stuffing, just keeping it simple - mix together the crumbled paneer, spinach, salt, chili powder and garam masala. 

7. Fill this stuffing inside each steamed karela round. Heat oil for shallow frying. Gently drop in the stuffed karelas and fry on low to medium heat, on both sides till golden brown. Remove and drain excess oil.


8. When ready to serve, warm the gravy. Place the fried karela on the serving plates and gently pour the gravy on top or around. Garnish with coriander.


19 October 2015

Stuffed Multi-grain Parathas

Day 5 of Navratri and third day of Lakshmi pooja (3 days each for Durga-Lakshmi-Saraswathi), this also coincided with something to prepare for our 10th #FoodieMonday #BlogHop, and this week the theme was food that we prepare during the festival. Anything ranging from Faraali dishes to sweets, to simple daily prasad....My preparation...stuffed Multi-grain Parathas. 
With my new-found love, actually turning into obsession (!!), for millets, this one has both Bajra and Ragi flours with multi-grain wheat flour to supplement and to help in binding.


STUFFED MULTI-GRAIN PARATHA
Ingredients :

For the dough :
Pearl Millet (Bajra) flour - 1/2 cup
Finger Millet (Ragi) flour - 1/2 cup
Soya flour - 1/4 cup
Multi-grain or whole wheat flour - 1 cup
Salt to taste
Oil - 1 tbsp
Water as required

For the stuffing :
Finely chopped carrot - 1/2 cup
Finely chopped capsicum - 1/2 cup
Roughly chopped or torn Spinach leaves - 1 cup
Crumbled Paneer - 1 cup
Cumin (Jeera) seeds - 1 tsp
Salt to taste
Turmeric (Haldi) powder - 1/2 tsp
Garam masala - 1 & 1/2 tsps
Chili powder - 2 tsps
Oil - 2 tbsps

Method :

1. To prepare the dough, add the flours and salt to a bowl. Knead into a soft dough using enough water. Pour a little oil over the top and knead lightly just once. Leave aside to rest for about 10 minutes.

2. Now the stuffing, heat 2 tbsps oil in a pan, add jeera and let crackle.

3. Add chopped carrot along with turmeric powder, cover and cook for about 5 minutes. Now add in the capsicum and spinach leaves as well, salt to taste, mix and again cover cook for 5 minutes more. Stir once and finally add the paneer and let cook uncovered for 5 minutes more. 

4. Add garam masala, chili powder and check salt. Cook for 2-3 minutes more and transfer to a bowl and let cool to room temperature. 

5. Divide the dough and stuffing into equal portions. Make a cup of the one dough round and place the stuffing inside. Seal properly and flatten gently. Now roll out into a thick roti of about 1/2 cm thickness. Repeat with remaining dough.

6. Heat a tawa and place the paratha on it to cook. Cook for a bit on both sides, then let cook using oil / ghee till golden brown and well-cooked. 
Note : Due to use of millet, cook the parathas slightly longer till well done.
Remove and serve hot with desired accompaniment.